
Locating Your Cleanout

If you find yourself in the position of calling our company to fix a drain back-up, one of the most common questions we’ll extend to you is whether or not your property has a cleanout. All too often, this is met with marked perplexity from the customer as to just what a cleanout actually is.

So Just What IS A Cleanout Anyway?

The cleanout plays an important role in your property’s plumbing and waste disposal system. It allows easy outside access to your pipes via a cap or cover in case the drain line needs to be examined or cleared. For your sewer lines, the sewer line is typically located on the ground in the front or backyard.
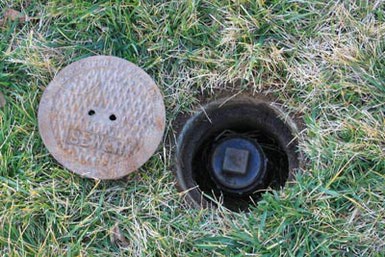

There is also a cleanout for the kitchen line of a property, which is located on the exterior of the kitchen where the sink drain is.


If your property does not have either type of cleanouts, our plumbers will be happy to provide a quote for installing one. This will save you money in the long-term on remedying any future clogs. Rather than having to disassemble the pipes under your kitchen sink or removing your toilet, the plumber can perform a simple snaking service through the pipes that the cleanout will allow direct access to.

Comments

Popular posts from this blog

Low shower head pressure; DIY quick tip

If you are experiencing low pressure from your shower head it can be caused by several things.  Remove showerhead and run water to check actual water volume and pressure. Before replacing showerhead it's a good idea to apply fresh plumbing tape (clockwise direction) to prevent any showerhead leaks. Flow restrictor valve/ water saver. Remove washer and colored restrictor flow valve replace washer. Calcium/Magnesium or lime  scale build up. Single Lever A single lever shower set up, remove handle and cover to get access to valve and cartridge.  Adjust hot 'red' screw, back off counter clockwise or/and cold 'blue' screw as needed for more pressure  flow. (Use Hex/Allan key, 2.5mm flathead screw driver, needle nose pliers). You may need to replace cartridge, clear clogged pipes.  You can purchase a water pressure gauge for your home to test overall water pressure coming into your household from city; 50 psi is generally good pressure.  Use Hex/Allan key, 2.5mm ...

Home Remedies: (to clear a clogged drain)

Things you can try at home to unclog drains :  Plunger:   Of course the first thing we would try is a plunger to unclog a drain but if that don't work you can try these other methods before calling a plumber. A wire hanger  can be extended and bend a hook at the one end of the hanger to fish out anything that may be clogging the drain. Boiling water and dish soap:   Boil about 2 liters of water and 2 table spoons of dish soap and slowly pour it into kitchen sink drain.  This may take a few times but will turn grease into a liquid form to help grease travel out of the drain and clear.  You may want to do this on a regular basis as a precaution to keep the drain clear of grease. Baking soda and Salt :  About a 1/2 cup each mix together and let sit a hour or more then add boiling hot water. Baking Soda and Vinegar:   Pour 1/2 cup of baking soda and 1/2 cup of vinegar into drain wait about 1 hour then add boiling hot water.  This should ...

Our reputation has leaked out!

  Our Smartplumber Joey was dispatched to a familiar scenario where customers are too often faced with a sudden increase in their monthly water bill. In no time at all, our Smartplumber was able to quickly determine that the laundry room had sprung a leak; underneath the hot water line piping stone-tiled floor!   This was determined by using a thermal heat sensor that was used to locate the direction of the pipeline and where exactly the pipe damage was.   (This type of device reminds me of a Dr's stethoscope, where earphones and a sensor are used to detect and hear soft hissing sounds). Next, our Smartplumber Joey had to excavate a 1-foot hole beneath the stone tile directly above the heat source was and where the hissing sound was detected. Hey, presto! Sure enough, there was a corroded hairline crack in the 3/4" copper piping directly below.  Joey, then went on to patch the copper piping with a soldering copper patch. (These copper patches are proven to ...